By Todd Barron @ FoodieCuisine.com
I get asked about roasted garlic quite often so here is the really quick story on how to roast your own. Garlic by itself is a very pungent ingredient and sometimes even an appetizer unto itself. One nice way to remove the sharp flavor of raw garlic is to roast it first.
Basic Steps
There are a few basic steps involved in roasting garlic and they are as follows:
- Buy a whole head of garlic
- Pull the head apart to reveal whole cloves
- Peel the cloves
- Cut a 10″ x 10″ sheet of aluminum foil
- Place the garlic in the middle
- Drizzle olive oil over the top
- Season with salt and pepper
- Wrap the foil tightly around the garlic forming a ball
- Bake at 450 degrees for 30-45 minutes
Peeling Garlic
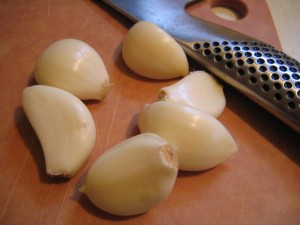
The part about buying the garlic and pulling apart the cloves should be rather obvious. How to peel garlic? That’s easy actually. With the whole clove on the cutting board, place your chef’s knife on it’s side on top of the clove. Give the side of the knife a nice slap with the palm of your hand. The force should be enough to slightly crush the garlic but not destroy it. This force will then enable you to slide the skin off of the garlic easily. If you tap it too lightly, just hit it again but harder. If you smash the garlic, use less force on the next try. When complete your garlic should look like the picture above. Be careful so that you don’t cut yourself. If you aren’t comfortable with using a knife this way you can always buy a garlic peeler and go that route.
Season and Wrap it Up
Once the garlic is peeled, you should take the 10 or so cloves and put them in the center of the piece of aluminum foil. I usually just tear a sheet off about 10″ long for this. With the garlic in the center, drizzle a nice extra virgin olive oil over the top and then season with salt and pepper. I prefer to use a nice oillike Villa Cappelli‘s Extra Virgin Olive Oil. With the garlic seasoned it’s time to wrap it up tightly. You do this by pulling the sides together and forming a aluminum bulb of what resembles a whole head of garlic. Amazing how the design looks like what you started with eh?
Bake it
Put the ball of foil into the oven, set it at 450 degrees, and then wait about 45 minutes. Sometimes mine is ready in 30 minutes and sometimes it takes an hour. It really just depends on the garlic you are working with. The best way to tell is the smell and I can’t write about how to do that. You will learn over time what to keep a nose out for though.
When the time is up (and the garlic smells right,) pull it out of the oven with a hot pad or a pair of tongs and let it rest. You should let it rest for 30 minutes or more to let it cool down to room temperature. Once it’s cool, unwrap the garlic and inside you will find some tasty goodness.
Serving Tips
You can use the roasted garlic in stews, soups, as part of a cheese platter, or even spread it on top of freshly tosted bread. Basically you can use it as a garlic replacement in anything and it will give you a nice extra layer of flavor. Personally, I roast garlic for many different things and it never disappoints. The other nice thing is that you can roast it days ahead of time. Just put what you don’t use in a air-tight container in the refrigerator and save it for up to 5 days.
One final note about devices made for roasting garlic. You can find them in most cooking stores and even in grocery stores. While you may find them useful, I find that a wad of aluminum foil does the trick just as well. If you are concerned about the health impact of roasting in aluminum foil then I’d consider one. I prefer to keep my number of speciality items (and clutter) down to a minimum; therefore, I don’t use one.
Eating Light Tip
Drain as much of the olive oil as you can away from the garlic before you eat it. The flavor will still be there but without the extra few calories.
Bon appétit!

